• Welcome to Overclockers Forums! Join us to reply in threads, receive reduced ads, and to customize your site experience!

* The Official Team 32 Install Guide : Windows, Linux; CPU, GPU *

Overclockers is supported by our readers. When you click a link to make a purchase, we may earn a commission. Learn More.

David

Forums Super Moderator
Joined
Feb 20, 2001
Introduction

This is an all-in-one sticky to cover installation on all platforms. Please let me know if anything needs added or fixed. This is based on a number of other threads by the following members. Thanks to them for their contributions:


  • Adak - SMP/Ubuntu (Post #1)
  • Jolly-Swagman - SMP/Vista or XP (Post #2)
  • Harlam357 - SMP MPICH2 Client (Post #3)
  • Nitteo - GPU2 (Post #4) [Also link to GPU2 for Linux]
  • Leelegend - SMP/VMWare (Post #5)
  • Landshark - Multi-GPU2 (Post #6)


The Basics
  • How does it work?
    Folding@Home downloads a chunk of data, processes it and returns the results to Stanford who assemble all the data and can determine if any interesting results have been raised.
  • Why different clients?
    There are clients for various platforms, and each is optimised for the platform it runs on:
    • Classic client is the easiest one to deal with and can run on Mac OSX (PPC or x86), Linux or Windows (98SE or later).
    • SMP Client for XP and Vista is optimised for multiple-core systems, particularly quad core chips.
    • GPU2 client runs on Graphics Cards
    • Playstation 3 client runs on... PS3s!
  • Where do I get it?
    Download it from here.
  • What team do I fold for?
    We are Team 32!
SMP/Ubuntu
Originally written by Cluster

This guide is for anyone running dual or quad-core setups that need windows as their main OS, but want more PPD than the windows SMP client can provide. The reason for this is that the linux client is more effecient(even through a VM) and also the linux client has access to A2 WUs which seem to provide much better throughput and thus more PPD.

Before i begin i'd like to make a couple of notes. If you can at all, it is better to run linux as your main OS as you remove the overhead of the VM, obviously getting even better output. Now results may vary with systems and time, after going through this myself, i went from 1100ppd to 3-4k ppd, not a trivial increase. One more thing, make sure you have the ram for this. Each of my VMs uses between 550-650mb of ram.

Also, while this guide uses Ubuntu 8.04, you can use any linux distro. Ubuntu is not the lightest choice, but it is the simplest to get setup on. For those that wont to setup a VM in order to clone across multiple systems, a slimmer Linux install might be better as you can get away with much less than a 5gb disk to install the OS on.

System requirements
1.5GB of Ram
15GB HDD Space (using Ubuntu 8.04)
All your cpu cycles! :D

The basic process goes something like this :

  1. [*]Download VmWare and Ubuntu
    [*]Install VmWare
    [*]Install Ubuntu
    [*]Configure Ubuntu and download F@H
    [*]Install VmWare Toolso
    [*]Copy the VM
    [*]Configure the client and Fold Fold Fold!
The Stuff You Need

Both VmWare and Ubuntu are big downloads. VmWare is a little over 100mb, Ubuntu is around 700mb. Will give you lots of time to skim through the guide once or twice.
  1. Vmware Server 150MB

    A Note for Vista64 users. If you try to install vmware, it is going to complain about unsigned drivers. See Appendix I for details.

    For those who might wish to take the leap to guinea pig status, VmWare Server 2.0 is the latest offering. It uses a Web UI instead of a regular GUI. I haven't been successful at getting the web ui to load, probably because i neuter my windows installs *shrug*
  2. Ubuntu Download [700MB]
    !!! Remember to choose 64-bit !!!

    It does not matter if you use a 64-bit Host OS or not. Its all the same if your on 32-bit windows, but the guest linux OS needs to be 64-bit. Also it was reported there was some issue with kernel version supplied in Ubuntu 8.10. Until i hear different i'll recommend using 8.04-64bit, or until a new Ubuntu release is available to test on.
What To Do With The Stuff
  1. Install VmWare Server

    Pretty straightforward, just install with the rest of your software. Vista64 users read Appendix I before doing this or windows will crap on you.
  2. Create directories for VMs

    You'll want to create two directories for each VM. I named mine C:\FAH\SMP1 and C:\FAH\SMP2.
  3. Configure your VM

    Start up the VmWare Server Console, localhost should be highlighted, select connect, then create a new virtual machine.

    Note: If when you boot up windows, and open the console to start your VMs, the localhost option is not shown, this means that the services have not started yet. It takes them a few seconds, close the console and try again in a minute.
    • Select Custom install
    • The type of Guest OS is Linux -> Ubuntu-64bit
    • Name the VM (SMP1) and select the directory you created earlier (C:\FAH\SMP1)
    • Leaving access rights and startup/shutdown at default is fine.
    • Select 2 Processors
    • Set the amount of ram for the VM (Min: 640, Recommended: 768)
    • Select Bridged Networking.
    • Create a 5GB Virtual Disk - Allocate all disk space now
    • Name the disk whatever you like and hit finish.
    • Select your VM from the Tabs at the top if its not already. In the main window below Start this VM, click Edit this VMs settings. We want to configure a CD-Rom that points to our Ubuntu ISO. Click CD-Rom on the left, and on the right there will be an option to set the drive to read an ISO image. Select the ISO option and point it to your Ubuntu ISO.
    • Start the VM and install Ubuntu

      For the most part you should be able to select the default install setup. Selecting timezone/keyboard/language as needed.
  4. Configure Ubuntu

    Once your at the Ubuntu desktop, feel free to change your desktop, some people aren't to partial of the stork :p
    • Install the 32-bit math libs for F@H

      Code:
      > sudo apt-get install ia32-libs
    • Open FireFox (you should see it on the taskbar at the top) and make your way to the Stanford F@H Page, download the linux client. You should see a tarball (.tar.gz file) on your desktop.
    • Double click the archive to open the archive manager, click extract, and choose a location. I put mine in /home/[username]/FAH. Do not start the folding client until you have finished and have the second VM copied. They need to be configured separately.
    • I highly recommend that you install VmWare Tools at this time. Amongst other things, it adds in time synchronization between host/guest OSes. See Appendix III for the install of this.
    • If you want to setup samba, which will allow you to share your FAH directory and make it visible to FahMon, see Appendix IV for the samba setup.
Copying Your Stuff

Now that the hard part is over with, we're almost done, the last step is to make a copy of your new VM.
  1. Stop the VM you have running already.
  2. Go to the directory where you created the VM and copy all of the files over to the other directory you created. (Copy from C:\FAH\SMP1 to C:\FAH\SMP2). This may take a couple of minutes as it is copying the 5gb vitual hard driver you created.
  3. Hop back into the VmWare Server Console, select File > Open > Browse, point it to your _second_ vm (C:\FAH\SMP2) and select the file that shows up. It will ask you if you have copied this VM and if you would like to create a new Machine ID, select create new machine ID.
  4. You should now have two VMs in VmWare. Start them up, open the command line console, go to the directory where you unzipped the client (/home/[username]/FAH), configure the clients, and enjoy your awesome PPD.

    Code:
    > cd ~/FAH
    > ./fah6 -smp -verbosity 9
Appendix

I - Windows Vista 64-bit notes
Quote:
Windows 64-bit users are going to have the problem of windows complaining about unsigned drivers. For this you have a couple of options.

A) Use Vmware server 2.0. I did do an install of vmware 2.0 and windows did not complain. But i have not configured a vm with it yet. In the future perhaps i will do this, or if someone else cares to, i will add the install procedure for vmware server 2.0.

B) Before windows starts loading, just after your bios finish the POST routine, hit your F8 key and it will bring up an advanced boot menu. In there is an option to disable driver signature checking. The only annoying part is, you will have to do this every time you reboot. This is what i do, but i have to go through a multi-boot menu regardless.

C)For this option you will have to perform the above operation for the install of vmware server 1.0.x, reboot, F8, select disable driver signing, and install vmware. There is also an application that will enable 'Test Mode' for vista64. This is designed for developers who are creating drivers that are not yet signed. It allows you to set Test Mode on which is basically the same as doing (B). Hit up google for enabling windows vista 64 test mode for more info.
II - Setting vmware priority/affinity
Quote:
Once everything is up and running. Hop into Task Manager and find the two vmware-vmx.exe processes. If you use this system, and its not a dedicated folding rig, you'll want to set their priority to Low. Otherwise you will notice some lag as the vmware priority overrides the clients. So instead of your clients picking up idle cycles, they'll be competing for cycles like every other process, and generally they win ;)

Now for affinities, its recommended to set one processes to cores 0/1 and the other to cores 2/3. Latest word from the new nvidia drivers is their client is using very little cpu time, so this would be a good setup even for those with nvidia gpu clients.

If you have ATI clients running, atm they're still using a good part of 1 core, then set _both_ vm processes to 0/1/2 and let the gpu client have core 3. The gpu client may not pick up all of core 3, but there are some other processes aside from the vmware-vmx ones that the vm is using. This will pick up whats left on core 3. On my system, this is what i do, and core 3 is averaging 95-97%, while cores 0/1/2 are almost solid at 100%. I tried doing core 0/1 to one vm and just core 2 to the other, and it didnt seem to work all that hot, ymmv.
III - Setting up VMWare Tools by the_cultie
Quote:

  1. When you have your VM open go the toolbar and click VM and select Install VMware Tools. A window will appear asking you to make sure the guest operating system is running. Click install to proceed.
  2. On the guest OS desktop there should now be a DVD icon called VMware tools. Open it and extract the contents of the file called VMwareTools-1.0.8-xxxxxx.tar.gz to your Home Folder (also called [username] in the extract manager). It’s a good idea to go into the Home Folder and re-name the vmware-tools-distrib to something short like vmt as it saves some typing later on.
  3. Open up Terminal and enter the following:

    -> cd ~/vmt
    -> sudo ./vmware-install.pl

    It will then ask you to select where to install the Binary Files, Init Directories, Init Scripts, Daemon Files, Library Files, and the Documentation. For each one just press enter and they will be installed in default locations. You will then be asked if you want to VMware Tools; just press enter to continue.
  4. When the configuration starts you may get the following warning depending on the version of Linux you are using:

    None of the pre-built vmhgfs modules for VMware Tools is suitable for your running kernel. Do you want this program to try and build the vmhgfs module for your system (you need to have a C compiler installed on your system)? [yes]

    Just press enter and when it asks for the location of the directory of C header files just press enter again for the default location. The module is then built.
    When it is finished press enter again to continue. You are then asked to select a resolution for you screen by selecting a number from the list 1-13 where each number is for a different resolution. Press enter after making you selection and VMware Tools is installed. You should then re-start Linux before continuing.
  5. After restarting Linux its time to actually configure VMware Tools to keep the time synchronized with your system time.
    Open Terminal and enter the following:

    -> vmware-toolbox &

    This will launch the VMware Tools. On the first tab of the window that open you will find an option for Time Synchronization Between the Virtual Machine and the Host Operation System. Tick the box beside it and click close. Your time will now stay synchronized with your system time.
Last Update: 03/2009
 
Last edited by a moderator:
SMP/XP/Vista
Originally written by Jolly-Swagman

HOW TO INSTALL V6.22b2 (DEINO) CLIENT FROM SCRATCH
  • Requirements and Expiration

    DON'T FORGET - YOU NEED TO INSTALL THE MICROSOFT .NET v2.0 RUNTIME FOR THE WINDOWS SMP CLIENT TO WORK
    I'd also suggest running The .Net 2.0 Service Pack 1 over it too, and then patch it completely via Windows update!!!

    This is a beta client, it has an expiration date of Feb 2, 2009 @ 1100 AEDT. It is the recommended beta for 32-bit systems as it is much more stable than the MIPCH2 client.
  • Getting the Windows SMP Client

    Client Direct Link:
    http://www.stanford.edu/group/pandegroup/folding/release/FAH6.22beta2-win32-SMP-deino.zip

    I suggest downloading this to a network accessible share Folder so you can install to other machines, I personally have an 'FoldingApps' share on my Main Rig which is a good place to keep all Apps and Progs to do with Folding.

    Unzip this archive to it's own folder. You could rename it to 'WinSMP v6.22b2 SMP Deino 32' or something. I use WinZip or WinRAR so I merely right click the file, Extract to <filename>/ and rename the folder.

    Go into this folder and find the executable, it should be called [email protected] - rename it to [email protected]
    *NOTE-1* If you not comfortable renaming it just move to some other folder eg- Folding Backups, ect
    Download Direct Link
    http://www.stanford.edu/~kasson/folding/FAH6.22beta2-SMP-shm.exe to the directory you unzipped everything to. You could rename it to FAH6.exe but there is no need if you create shortcuts. I personally leave it.
    *NOTE-2* the above file has been updated by Kasson @ Stanford by this one below, and has a fix for EUE's
    Download Direct Links
    Its new 6.22beta2r2 client [fix terminate on EUE] [not ACK fix]
    http://www.stanford.edu/~kasson/folding/windows/6.22b2r2.exe

    **NOTE-3** the above file has been updated by Kasson @ Stanford by this one below, and has a fix for ACK
    Its new 6.22beta2r3 client [ACK fix]
    http://www.stanford.edu/~kasson/folding/windows/[email protected]
  • Install Instructions:
    1. Clear out your old directory. If you formerly had WinSMP 5.92 beta (the Deino one) then I suggest uninstalling both the WinSMP client and the DeinoMPI from Add/Remove Programs. Once that has finished, delete everything in your former WinSMP install folder.
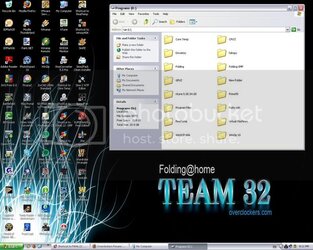
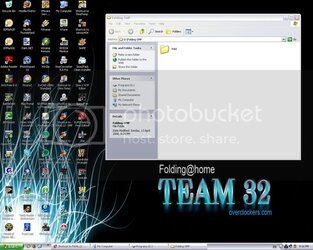
    2. Create your folding install directory. For a single SMP instance (now recommended) use C:\Folding-SMP\FAH\\ as this allows you to run GPU folding in C:\Folding-SMP\FAH\GPU1\, C:\Folding-SMP\FAH\GPU2\ etc.
      If you want to run dual instances, then C:\Folding-SMP\FAH1\, C:\Folding-SMP\FAH2\ as I am sure you can imagine.
      (I Personally use my D: Programs Drive eg- D:\Folding-SMP\FAH )
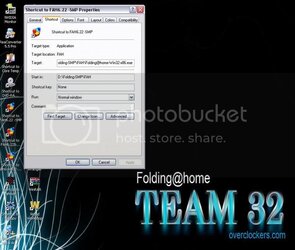
      see pic1&2

      *NOTE* In VISTA Dont RUN the Client Directly From C:\Programs Files
      pic1
      Folding-SMPpic1.jpg

      pic2
      Folding-SMPpic2.jpg

      pic3

      Folding-SMPpic3.jpg

      I suggest that you name the folder number after the machine instance that you set up in the configuration, just to keep things a bit simpler. Just remember that the first client should be \FAH1, second client should be \FAH2 etc etc
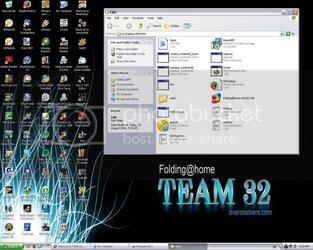
    3. Copy the contents of your unzipped archive directory, including the new EXE file. If you are running dual instances, then copy the same files into your second \FAH folder. ( see pic 3 )
    4. Run the install.bat file. This will prompt you to install DeinoMPI. Do so, accept all licences and install. Do not modify any install directories etc. Once DeinoMPI is installed, a command prompt will pop up starting the MPI service... just wait!

      pic3-1

      Folding-SMPpic3-1.jpg
    5. Install Bat will now ask if want to create a "credential store". Say yes (just hit enter)
    6. Install.bat will keep running, and will ask you to create a "credential store". Say Yes (just hit enter)
    7. It will ask for a private key. Hit Enter, and then it will ask for confirmation of no key. Type 'Yes' in and hit enter (the full thing not just 'y' like configuring the client!!)
    8. Now it asks whether you want to encrypt the credentials. Select Yes (just hit enter)
    9. You are now asked if you want to store the credentials in the registry or hard drive. Select Registry (just hit enter)
    10. Enter your username and password you wish to run the client as (same as last version --Your Windows Login)"You MUST have a password and be signed into the account with that password"
    11. You get the 'If you see this twice, MPI is working' message and the install.bat shuts.
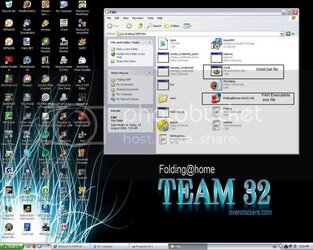
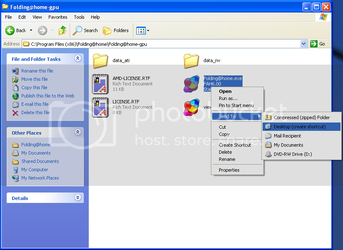
    12. Now we have to run the client to configure it. Before you do, set up your screen so the windows explorer window is not maximised, and you can se your desktop. Right-Click the executable, down the list you should see Send To- Click on Send to Desktop Create Shortcut, This will place a Shortcut to your desktop. Then do it again.

      pic4

      Folding-SMPpic7.jpg
    13. Rename one of these Shortcuts 'FAH6.22-SMP' (or " FAH1 ", depending on what you named your directories). ( see pic 4 )
      Rename the other one as 'FAH6.22-configure or FAH1-configure'.

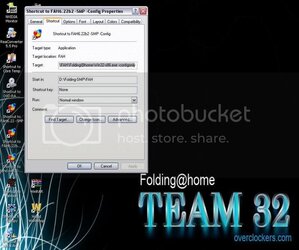
      pic5

      Folding-SMPpic8.jpg

      On this second shortcut, right click the shortcut, select Properties. Now, fix the target to be C:\Folding-SMP\FAH\[email protected] -configonly ( see pic 5 )
    14. Run the '-Configure' Shortcut. You are now prompted to configure the client. The suggested settings you need to put in are YELLOW, the defaults are in the [square brackets]:

      Folding@Home User Configuration

      User name []? (Your Folding Name )

      Team Number []? 32 (As you will be Folding for Team32)

      Passkey []? (if you do not have a passkey, go to http://fah-web.stanford.edu/cgi-bin/getpasskey.py and get one, make sure you keep it in multiple places (email at home and work, USB key, and somewhere else backed up). Familiarise yourself with what a passkey is with the Stanford Passkey FAQ)
      Or just hit enter 9if you dont use passkey)
      Ask before fetching/sending work (no/yes) [no]? No

      Use proxy (yes/no) [no]? No (unless you have a network proxy, like some ISPs (usually dialup) and businesses/universities do, you should have the details of this proxy, if not have a look in your IE/Firefoz/Opera ect. settings. Username and Password will most likely be your Network Domain Password - the ones you log into your machine with)

      Acceptable size of work assignment and work result packets (bigger units may have large memory demands) -- 'small' is <5MB, 'normal' is <10MB, and 'big' is >10MB (small/normal/big) [normal]? Big if you have a decent amount of RAM and plenty of download quota, otherwise normal is fine

      Change advanced options (yes/no) [no]? yes

      Launch automatically, install as a service in this directory (yes/no) [no]? no (Still not supported as a service. Do not try to run under a service unless you know what you are doing)

      Core Priority (idle/low) [idle]? idle

      CPU usage requested (5-100) [100]? 100

      Disable highly optimized assembly code (no/yes) [no]? no

      Pause if battery power is being used (useful for laptops) (no/yes) [no]? no

      Interval, in minutes, between checkpoints (3-30) [15]? 15

      Memory, in MB, to indicate (XXXX available) [XXXX]? Whatever XXXX happens to be (set it to maximum unless you have a reason not to, or know what you are doing)
      (XXXX) eg: 2048MB 0r 1024MB

      Set -advmethods flag always, requesting new advanced scientific cores and/or work units if available (no/yes) [no]? yes

      Ignore any deadline information (mainly useful if system clock frequently has errors) (no/yes) [no]? no (but can be changed... not recommended though)

      Machine ID (1-16) [1]? 1 (set ID # accordingly to the number of clients etc [1] [2])

      The following options require you to restart the client before they take effect

      Disable CPU affinity lock (no/yes) [no]? no

      Additional client parameters. []? -smp -deino -forceasm -verbosity 9 (very important to do this here....please add at least this, more if you know what you are doing)

      IP address to bind core to (for viewer). Hit enter to clear []? (just hit enter... forget the viewers.... they are very buggy and the SMP does not come with one anyway)
    15. Okay, now that configure will close and we are ready to run the client. So open the 'FAH6.22-SMP' (or " FAH1 ", depending on what you named your directories). shortcut and let it rip!!! It should pick up a unit and start crunching.
      Add firewall exceptions if they pop up. Also add an exception to your AntiVirus/Spyware programs to NOT scan the Folding FAH/ directories
 
Last edited:
Originally written by Harlam357

FAH SMP Client v6.22b2 MPICH2 Install Guide


  • Step-by-Step Instructions:

    Note: The Windows SMP Client must be installed under a user account WITH A PASSWORD. Installing the client under a user with NO PASSWORD or a BLANK PASSWORD will result in the client not functioning.

    1. Install Microsoft .NET Framework v2.0 SP1 (Windows XP Only)

      - download x86 version from here or the x64 version from here


    2. Remove any previous FAH SMP Client Installs

      - Go to Add/Remove Programs and Remove any previous SMP Client Installs. If you have a previous version setup as a service then remember to run the client with the -configonly flag and remove the service before uninstalling.

      - If you needed to uninstall a previous SMP Client you will likely be asked to reboot. If so, do it now and pick up at the next step. If not asked to reboot, reboot anyway and pick up at the next step.


    3. Install the Folding@Home SMP Client v6.22b2 MPICH2

      - download the MPICH2 client from here

      - run the self-extracting installer, you will be presented with the following dialog:

      WinSMPInst1.PNG


      - Click Next

      WinSMPInst2.PNG


      - Click Next

      WinSMPInst3.PNG


      - Windows XP: The Destination Directory given is OK. I prefer to shorten the path to C:\Program Files\FAHSMP\. All further examples in this guide will be run from that location.

      - Windows XP 64-bit: Same as above, except be sure to install under the C:\Program Files (x86)\ Folder. For example: C:\Program Files (x86)\FAHSMP\

      - Vista 32-bit or 64-bit: DO NOT INSTALL UNDER PROGRAM FILES or PROGRAM FILES (x86). It's recommended to install in either - C:\Users\[username]\ *OR* on the root of C:\. Create a sub-folder under either of those locations. Again, I like to create a Folder named FAHSMP.

      examples:

      • C:\Users\harlam357\FAHSMP\

      • C:\FAHSMP\

      - Once you've got the right Destination Directory for your OS, Click Next.

      - The installer will go to work... wait for it to finish, then Click Finish.


    4. Setup MPICH2

      - Go to Start -> Run -> type cmd -> Click Ok.

      - Vista Only: Right-Click on Command Prompt and select 'Run as administrator'.

      - Navigate to the Destination Directory you chose earlier.

      examples:

      • type cd "\Program Files\FAHSMP" -> Press Enter

      • type cd "\Users\harlam357\FAHSMP" -> Press Enter


      - type install -> Press Enter - you will see the following:

      Note: Windows Firewall (or any other firewall) will begin to ask questions. You need to Allow both mpiexec.exe and smpd.exe.

      MPICH2 Process Manager, Argonne National Lab installed.
      account (domain\user) [(your domain)\(your username)]:


      - Be sure to look at what the installer presents as (your domain)\(your username). If they look correct (i.e. 'the name of your machine'\'your current account name'), just Press Enter - you will see the following:

      password:

      - type your user password (the password you use to login to Windows) ;) -> Press Enter

      confirm password:

      - do it again... type your user password -> Press Enter

      - You should now see the following messages:

      Password encrypted into the Registry.
      If you see this twice, MPI is working
      If you see this twice, MPI is working
      Press a key to continue...


      - If so, Congratulations!!! You're almost done. ;) Do not close the Command Prompt Window, you'll need it again for Step 6.

      - If not, start-over -> type install -> Press Enter


    5. Update your client .exe to beta2r3

      - download the updated client .exe file from here

      - Save the file in the Folder where you installed the FAH SMP Client and overwrite the file that is already there.


    6. Configure the SMP Client

      - type Folding@home-Win32-x86 -configonly -> Press Enter

      - Here's a rundown of how I configure a client for my 'User name'. Please note that options such as 'Memory, in MB, to indicate' and 'Machine ID (1-16)' can, and most likely will, be different than mine. Every FAH client installed on a machine needs a different Machine ID to run correctly. If you have more than one FAH client installed on your machine, be sure to check the Machine ID of the other clients first to avoid any conflicts.

      FAHSMP2.png


    7. Run It!

      Note: Anti-Virus programs can be problematic for FAH clients. Please be sure to set an exclude on your FAH Client directories.

      - type Folding@home-Win32-x86 -smp -verbosity 9 -forceasm -> Press Enter
 
Last edited by a moderator:
GPU2 Client
Originally written by nitteo
Edited by ChasR

1st Check if your GPU is here, nVidia Cuda Enabled GPU Products:
http://www.nvidia.com/object/cuda_learn_products.html

*IMPORTANT* BEFORE PART 1 UNINSTALL CURRENT NVIDIA DRIVER.*IMPORTANT* It is recommended that you use Driver Cleaner or Driver sweeper to fully remove the existing driver.

PART 1

1. Download the latest Official CUDA driver from this site:

http://www.nvidia.com/object/cuda_get.html

Choose your Version (XP x86 x64, Vista x86 x64) then download the driver.

2. Open the folder that contains the CUDA driver and double click on the Installer. Follow instructions.

4. Reboot.

PART 2

Download Riva Tuner from:

http://downloads.guru3d.com/download.php?det=163

Follow instructions to install.

Overclock the GPU. I have my 8800GT 512mb @ 725/1704/900 Stable. For FAH, only the Shader OC matters. You should unlink the shaders and adjust them. Shaders OC in 54 MHz steps regardless of what you set or GPU-Z reports. Use nVidia nTune to check for stability while overclocking.

PART 3

Download F@H:

http://www.stanford.edu/group/pandegroup/folding/release/[email protected]

Follow instructions, fill in your info.

***FOR THOSE Running with 1x SMP. Right Click on the Client on your taskbar. Go to Configure. Go to Advanced Tab. Check "Slightly higher priority if other DC applications are stopping Folding@home" (Thanks Dfonda)

PART 4

Download Fahmon:

http://fahmon.net/

1. Install fahmon and update project list.

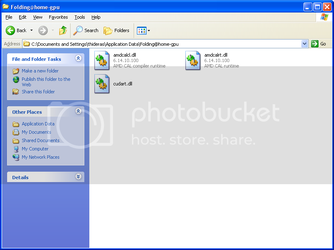
2a. (Vista) To point it to the GPU folder, SEARCH for APPDATA. In AppData locate the folder that says ROAMING. In Roaming find Folding@home-gpu folder. Right click on folder and copy location into the Fahmon.

2b. (XP) Point Fahmon to C:\Documents and Settings\{user name here}\Application Data\Folding@home-gpu (Thanks Raptord)

***DO NOT USE THE DISPLAY! IT LAGS TREMENDOUSLY and CRASHES(BSOD) sometimes.***

We have our discussion HERE, if you have any questions, comments about F@H with nVidia GPU2

We have our Benches HERE, so you can post and compare your score.
 
Last edited by a moderator:
SMP/VMWare
Originally written by leelegend

Thanks to Dropadrop for the terminal version, but here is easy way for windows users :)

1. download vmware from here http://www.vmware.com/download/server/
(see junebugs advise below, regarding versions, i have had no problem with 1.01)
and get a serial number


2. download ubunto desktop from here http://www.ubuntu.com/products/GetUbuntu/download#currentrelease
make sure you download the correct version for your hardware, its a big download so make sure!!
you will need the 64bit version: 64-bit PC (AMD64) desktop CD
this works with all AMD64 and new intel chips with 64bit instructions, make sure you enable virtulisation/64bit in the bios if there is a option.
burn the ISO to a CD.

3. Install VMWare, nice and easy windows installer :)

4. Load VMWare and create a new virtual machine (wizard), select "other" option and select "other 64bit" from the drop down.
select all of the default options, but make sure you select 2 processors
select the right amount of disk/memory for your machine (i currently install with 5gb of disk and 500mb ram
on the "network type" screen, i have been selecting "NAT" option, as it saves messing about with network settings, and just bridges your windows internet connection......

5. Put your previously burnt CD in the drive and "start virtual machine"
VMWare will start and hopefully boot off of the CD, you might need to restart the virtual machine again, so that it notices the cd.
once ubunto loads, try to surf the net, if that works you are ready to install.
ALTERNATIVELY (pscout:)), you can specify booting from the ISO image from within the VM machine settings that you created above, this is a lot quicker as it comes from the HD.

6. Run the Ubunto installer.....i just pick all of the default settings, you are running within a virtual machine, so it wont mess with your windows install whatever you pick....superb!!!
install away and reboot the virtual machine on completition (not the whole machine!).....take out the cd

7. restart the virtual machine (should be a lot quick now its running off of a hard drive!), surf the net again, to check all is ok.

8. in the Applications drop down menu (in ubunto) go to Accessories, select "terminal", and type:
sudo apt-get install ia32-libs
and answer yes to it request for disk space.
MAKE SURE NO OTHER INSTALLER IS RUNNING eg..patchs/updates, i would suggest running the above line first to save problems later

9. INSTALL folding at home SMP from typing the following:
mkdir -p ~/folding/FAH
cd ~/folding/FAH
wget http://folding.stanford.edu/release/FAH_SMP_Linux.tgz
tar xzf FAH_SMP_Linux.tgz

GET IT RUNNING WITH:
./fah5 - needs to be run each time you load linux (unless you setup a autorun)

There are further instructions for creating a batch file and flags etc here:
http://folding.stanford.edu/FAQ-SMP.html

i hope this helps....i have not used linux up until trying this, and i had it up and running in a couple of hours

TIP....ALT/CTRL PUTS THE MOUSE CONTROL BACK TO WINDOWS :)
TIP....use ctrl+c to stop the client (thanks Pacifist)

i am getting 9minutes a frame on a AMD X2 4400. Let me know if i have missed any steps.
you can also run a single windows CPU instance to soak up any left over idle process (probaly about 10-15%)
i am going to experiment with a SMP/GPU combination next weekend :)

lee
 
Last edited:
I've found quite a few people, including myself, keep on looking for this info; therefore, stickied.

-LandShark


Multi-GPU client Setup

Originally posted by thideras

Welcome to the Multi GPU folding walkthrough! My name is Thideras and I will be your guide, today we will be touring the majestic lands of GPU folding! This territory has only been recently discovered and is still very new to many people. Please sit back and relax as we continue our guide.


What you will need:
1) A computer with two or more nVidia GPU's (8800 or newer)
2) Internet connection
3) A serious amount of air conditioning for the room the computer will be in
4) This guide

-------------------------------------------------

Drivers:
I get my drivers from LaptopVideo2Go.com. He does a very good job in updating the drivers and getting them out quickly.

XP 32bit 177.35

XP 64bit 177.35

Vista 32bit 177.35
Vista 64bit 177.35

You will need to download the drivers AND the modified INF file on that page. When the drivers download, run the .exe (it is an extraction program) and it will create a folder on the desktop (example: 177.35_winxp64). Place the modified INF file in the folder, overwriting the existing one. Run the installer normally (setup.exe in the extracted folder) and reboot your computer.

-------------------------------------------------

Setting up:
You will first need two monitors (or one if you don't mind rebooting) to setup the cards and get them overclocked and configured for the folding client. Use Rivatuner along with RTHDRIBL to determine the max shader overclock for the cards. You only need to overclock the shaders, I have found that more core or memory speed does not help, it just adds heat. I suggest using RTHDRIBL over Furmark since you can specify what GPU it uses to render (File<Config Display<Display Adapter) and speeds up testing quite a bit.

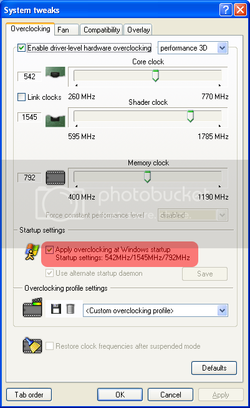
Once you find the max shader overclock for each card, check the box (for each GPU) to set that overclock during startup.

Rivasavesettings.png


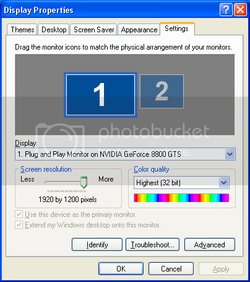
You can now remove the second monitor (if you used one) and restart. Please make sure to check the settings stuck after the restart and that you only have 1 screen enabled and 1 disabled. You can check that by right clicking on the desktop, click Properties and go to the last tab. One should be solid and another grayed out.

screens.png


If that is good, move on to the next section!

-------------------------------------------------

Downloading and installing the client:
Since we have all the cards setup, we need to download and install the client. Please download the client, 1.07 core and FAHMon:

F@H GPU Client
FAHMon

Download all three and run the F@H GPU Client's install. There is nothing you can change during the install, so no pictures needed. The program installs to "C:\Program Files\Folding@home\Folding@home-gpu" if you are on a 32bit system and "C:\Program Files (x86)\Folding@home\Folding@home-gpu" if you are on a 64bit system. At this time, DO NOT run anything in this folder, we have quite a bit more to configure.

Right click on the "[email protected]" file and select Send to<Desktop. Do that TWICE so we have duplicate shortcuts on the desktop.

Installfolder.png

We should now have two shortcuts on the desktop, let us rename them to "GPU1" and "GPU2" to keep it simple.

Shorcutunmodified.png

-------------------------------------------------

Configure shortcuts and folders:
Once you restart, you should have the F@H control panel window come up. We do not want to configure this right now, so go to the bottom right (next to the clock) and right click on the GPU Client icon and select "Quit". Go to Start<All Programs<Startup, right click on the "Folding@home-gpu" shortcut and delete it, this will prevent it from starting up the wrong way.

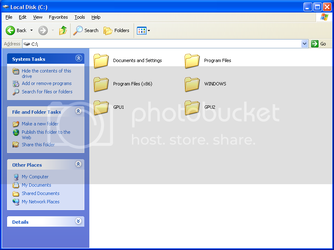
Create two folders on the C: drive labeled "GPU1" and "GPU2". These folders will be used as the "Start in" folder for the shortcuts that will will configure next.

createfolders.png


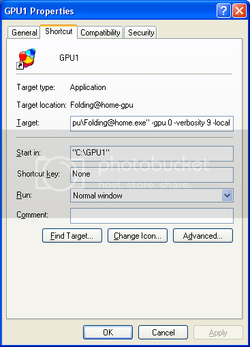
Back on the desktop, right click the "GPU1" shortcut and select Properties. In the "Target" box, leave the path the way it is but put your cursor AFTER the last double quote. Press your space bar one and type "-gpu 0 -verbosity 9 -local", do not put the "s that I have added. Change the "Start in" path to "C:\GPU1", leave the "s that I put in. It should look like this:

shortcutgpu0.png


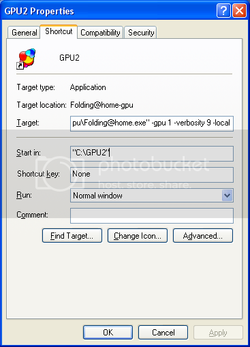
Hit OK once you have finished changing the two boxes. Right click on the "GPU2" shortcut on the desktop and click on "Properties". In the "Target" box, leave the path the way it is but put your cursor AFTER the last double quote. Press your space bar one and type "-gpu 1 -verbosity 9 -local", do not put the "s that I have added. Change the "Start in" path to "C:\GPU2", leave the "s that I put in. It should look like this:

shortcutgpu1.png

-------------------------------------------------

FAHMon setup:
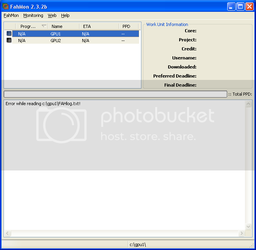
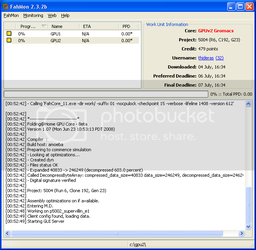
Since we have the folders created, we can now move onto the FAHMon installation and configuration. Install FAHMon from the exe that we downloaded earlier and run it from its shortcut. Right click in the list box and select "Add a new client". Give it the name "GPU1" and the location of "C:\GPU1" then hit OK. Right click in the list box again and select "Add a new client". Give it the name "GPU2" and the location of "C:\GPU2". You might notice that they show up as black squares, this is normal for now since there is no log in those folders yet. Go up to "Monitoring" and click "Show/Hide FAHLog", this will enable easier monitoring once we start each client. Your window should now look like this:

fahmonconfig.png


We will be using the following shortcuts quite a bit in the next section:
Reload selected client - F5
Reload all clients - F6

-------------------------------------------------

Copying the final files:
We have to copy a few files over so that the client can run properly. Open up the folder "C:\Documents and Settings\<username>\Application Data\Folding@home-gpu", please note that you must turn on viewing of system files and folder (Tools<Folder Options<View) before that folder is visible. There will be 3 files that we need to copy (and ONLY these 3!):

copyfiles.png


Copy those 3 files and paste them in C:\GPU1 and C:\GPU2...DO NOT skip this step, the client will not run without them.


Once you have all 3 files in each of the folders (C:\GPU1 and C:\GPU2), proceed onto the next step.

-------------------------------------------------

Running GPU1:
Since we now have everything configured except the actual client itself, we can attempt to run it! Using the shortcut we created on the desktop (very important!), double click the GPU1 shortcut. It may take a second or two, but we should get a screen labeled "Folding@home Control Panel". Fill in the username and team number. Go to the Connection tab and check the box that says "Allow receipt of work assignments and return of results greater than 10MB in size". Go to the advanced tab and check the box that says "Do NOT lock cores to specific CPU". At this time, the non-cpu locking feature is broken, although when they fix it, you will already have it setup.


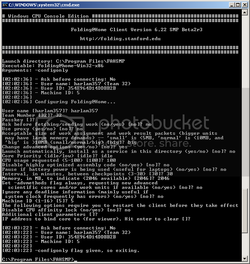
Switch back to FAHMon and select GPU1 in the list and start smashing the F5 key so you can watch the client start! It should show info like this:

Code:
--- Opening Log file [July 5 00:34:20] 


# Windows Console GPU Edition #################################################
###############################################################################

                       Folding@Home Client Version 6.12beta8

                          http://folding.stanford.edu

###############################################################################
###############################################################################

Launch directory: C:\GPU1
Arguments: -gpu 0 -verbosity 9 -local 

[00:34:32] - Ask before connecting: No
[00:34:32] - User name: thideras (Team 32)
[00:34:32] - User ID: 23B9894D0054EBD8
[00:34:32] - Machine ID: 1
[00:34:32] 
[00:34:32] Work directory not found. Creating...
[00:34:32] Could not open work queue, generating new queue...
[00:34:32] Initialization complete
[00:34:32] + Benchmarking ...
[00:34:32] - Preparing to get new work unit...
[00:34:32] + Attempting to get work packet
[00:34:32] - Autosending finished units...
[00:34:32] Trying to send all finished work units
[00:34:32] + No unsent completed units remaining.
[00:34:32] - Autosend completed
[00:34:32] - Will indicate memory of 2046 MB
[00:34:32] - Detect CPU. Vendor: GenuineIntel, Family: 6, Model: 15, Stepping: 11
[00:34:32] - Connecting to assignment server
[00:34:32] Connecting to http://assign-GPU.stanford.edu:8080/
[00:34:32] Posted data.
[00:34:32] Initial: 40AB; - Successful: assigned to (171.64.65.20).
[00:34:32] + News From Folding@Home: GPU folding beta
[00:34:33] Loaded queue successfully.
[00:34:33] Connecting to http://171.64.65.20:8080/
[00:34:34] Posted data.
[00:34:34] Initial: 0000; - Receiving payload (expected size: 41345)
[00:34:34] Conversation time very short, giving reduced weight in bandwidth avg
[00:34:34] - Downloaded at ~80 kB/s
[00:34:34] - Averaged speed for that direction ~80 kB/s
[00:34:34] + Received work.
[00:34:34] + Closed connections
[00:34:34] 
[00:34:34] + Processing work unit
[00:34:34] Core required: FahCore_11.exe
[00:34:34] Core found.
[00:34:34] Working on queue slot 01 [July 5 00:34:34]
[00:34:34] + Working ...
[00:34:34] - Calling 'FahCore_11.exe -dir work/ -suffix 01 -nocpulock -checkpoint 15 -verbose -lifeline 976 -version 612'

[00:34:35] 
[00:34:35] *------------------------------*
[00:34:35] Folding@Home GPU Core - Beta
[00:34:35] Version 1.07 (Mon Jun 23 10:53:13 PDT 2008)
[00:34:35] 
[00:34:35] Compiler  : 
[00:34:35] Build host: amoeba 
[00:34:35] Preparing to commence simulation
[00:34:35] - Looking at optimizations...
[00:34:35] - Created dyn
[00:34:35] - Files status OK
[00:34:35] - Expanded 40833 -> 246249 (decompressed 603.0 percent)
[00:34:35] Called DecompressByteArray: compressed_data_size=40833 data_size=246249, decompressed_data_size=246249 diff=0
[00:34:35] - Digital signature verified
[00:34:35] 
[00:34:35] Project: 5004 (Run 6, Clone 192, Gen 23)
[00:34:35] 
[00:34:35] Assembly optimizations on if available.
[00:34:35] Entering M.D.
[00:34:41] Working on p5002_supervillin_e1
[00:34:42] Client config found, loading data.
[00:34:42] Starting GUI Server
If it does, GREAT! That means it is working! If not, please review all the steps to make sure you didn't miss anything! Please leave the client running to make sure that the second one is using the second card.

GPU1 is configured!

-------------------------------------------------

Running GPU2:
Since we now have everything configured except the actual client itself, we can attempt to run it! Using the shortcut we created on the desktop (very important!), double click the GPU2 shortcut. It may take a second or two, but we should get a screen labeled "Folding@home Control Panel". Fill in the username and team number. Go to the Connection tab and check the box that says "Allow receipt of work assignments and return of results greater than 10MB in size". Go to the advanced tab and check the box that says "Do NOT lock cores to specific CPU". At this time, the non-cpu locking feature is broken, although when they fix it, you will already have it setup.


Switch back to FAHMon and select GPU2 in the list and start smashing the F5 key so you can watch the client start! It should show info like this:

Code:
--- Opening Log file [July 5 00:38:08] 


# Windows Console GPU Edition #################################################
###############################################################################

                       Folding@Home Client Version 6.12beta8

                          http://folding.stanford.edu

###############################################################################
###############################################################################

Launch directory: C:\GPU2
Arguments: -gpu 1 -verbosity 9 -local 

[00:38:19] - Ask before connecting: No
[00:38:19] - User name: thideras (Team 32)
[00:38:19] - User ID: 23B9894D0054EBD8
[00:38:19] - Machine ID: 2
[00:38:19] 
[00:38:19] Work directory not found. Creating...
[00:38:19] Could not open work queue, generating new queue...
[00:38:20] Initialization complete
[00:38:20] + Benchmarking ...
[00:38:20] - Preparing to get new work unit...
[00:38:20] + Attempting to get work packet
[00:38:20] - Autosending finished units...
[00:38:20] Trying to send all finished work units
[00:38:20] + No unsent completed units remaining.
[00:38:20] - Autosend completed
[00:38:20] - Will indicate memory of 2046 MB
[00:38:20] - Detect CPU. Vendor: GenuineIntel, Family: 6, Model: 15, Stepping: 11
[00:38:20] - Connecting to assignment server
[00:38:20] Connecting to http://assign-GPU.stanford.edu:8080/
[00:38:20] Posted data.
[00:38:20] Initial: 40AB; - Successful: assigned to (171.64.65.20).
[00:38:20] + News From Folding@Home: GPU folding beta
[00:38:20] Loaded queue successfully.
[00:38:20] Connecting to http://171.64.65.20:8080/
[00:38:22] Posted data.
[00:38:22] Initial: 0000; - Receiving payload (expected size: 41345)
[00:38:22] Conversation time very short, giving reduced weight in bandwidth avg
[00:38:22] - Downloaded at ~80 kB/s
[00:38:22] - Averaged speed for that direction ~80 kB/s
[00:38:22] + Received work.
[00:38:22] + Closed connections
[00:38:22] 
[00:38:22] + Processing work unit
[00:38:22] Core required: FahCore_11.exe
[00:38:22] Core found.
[00:38:22] Working on queue slot 01 [July 5 00:38:22]
[00:38:22] + Working ...
[00:38:22] - Calling 'FahCore_11.exe -dir work/ -suffix 01 -nocpulock -checkpoint 15 -verbose -lifeline 1792 -version 612'

[00:38:23] 
[00:38:23] *------------------------------*
[00:38:23] Folding@Home GPU Core - Beta
[00:38:23] Version 1.07 (Mon Jun 23 10:53:13 PDT 2008)
[00:38:23] 
[00:38:23] Compiler  : 
[00:38:23] Build host: amoeba 
[00:38:23] Preparing to commence simulation
[00:38:23] - Looking at optimizations...
[00:38:23] - Created dyn
[00:38:23] - Files status OK
[00:38:23] - Expanded 40833 -> 246249 (decompressed 603.0 percent)
[00:38:23] Called DecompressByteArray: compressed_data_size=40833 data_size=246249, decompressed_data_size=246249 diff=0
[00:38:23] - Digital signature verified
[00:38:23] 
[00:38:23] Project: 5004 (Run 6, Clone 192, Gen 23)
[00:38:23] 
[00:38:23] Assembly optimizations on if available.
[00:38:23] Entering M.D.
[00:38:29] Working on p5002_supervillin_e1
[00:38:30] Client config found, loading data.
[00:38:30] Starting GUI Server
GPU2 is configured!

You should now be able to just let them run. ALWAYS use the shortcuts that we created since they specify what folder to start in. FAHMon should now look like this:

fahmonfinal.png

If it is, just sit back and watch them crank out the WU's!
 
Last edited by a moderator:
question


what is an easy way to start the fah6 client under ubuntu instead of going into the terminal everytime and typing in

cd ~/FAH/
./fah6 -smp -forceasm -verbosity 9

Yep!

Code:
pico startfah

then type in to it:

Code:
cd ~/FAH/
./fah6 -smp -forceasm -verbosity 9

Then hit:

Code:
^X

And:

Code:
Y

And:

Code:
{ENTER}

Then change the properties for startfah to run as an executable and when you open the terminal:

Code:
./startfah

And that is it.

(You can substitute anything that is easy for you to remember for startfah. Heck "F" would work just as well.)

when you say hit ^X how should i be doing that? i tried pressing those 2 at once, didnt do anything.....

That means... Ctrl+X. ;)

Yep, Ctrl+X. The old ASCII way of representing it without using it is ^X. Sorry about that.
 
Last edited by a moderator:
Introduction

This is an all-in-one sticky to cover installation on all platforms. Please let me know if anything needs added or fixed. This is based on a number of other threads by the following members. Thanks to them for their contributions:

  • Adak - SMP/Ubuntu (Post #1)
  • Jolly-Swagman - SMP/Vista or XP (Post #2)
  • Harlam357 - SMP MPICH2 Client (Post #3)
  • Nitteo - GPU2 (Post #4) [Also link to GPU2 for Linux]
  • Leelegend - SMP/VMWare (Post #5)
  • Landshark - Multi-GPU2 (Post #6)


The Basics

  • How does it work?
    Folding@Home downloads a chunk of data, processes it and returns the results to Stanford who assemble all the data and can determine if any interesting results have been raised.

  • Why different clients?
    There are clients for various platforms, and each is optimised for the platform it runs on:
    • Classic client is the easiest one to deal with and can run on Mac OSX (PPC or x86), Linux or Windows (98SE or later).
    • SMP Client for XP and Vista is optimised for multiple-core systems, particularly quad core chips.
    • GPU2 client runs on Graphics Cards
    • Playstation 3 client runs on... PS3s!

  • Where do I get it?
    Download it from here.

  • What team do I fold for?
    We are Team 32!


SMP/Ubuntu
Originally written by Adak

Adak's Install Guide For Ubuntu 64 bit Linux & The FAH SMP Client From a CD to a Hard Drive with Windows

1) Download Unbuntu 64 bit Linux:
2) Burn the Image File You Downloaded:
  • Download the free utility program ImgBurn, from http://imgburn.com/ (click the download tab at the upper left
    hand corner of the page), and install it.

  • Open the ImgBurn program, and click on the Mode tab at the top of the window. Now select "Write".

  • In the lower right side of the window, select a slow write speed; 2 X is recommended for a Live CD burn. It's very important that the area around the CD is free of floor or loud music vibration, while the Live CD is being written.

  • Insert a writable blank CD, and click on the "Browse for File" (Open folder), icon (not the one with
    a plus on it)

  • Select your CD drive in the "Destination" dialog line.

  • Click on the BIG button surrounding the green >> arrow. (has a HD and CD icons on it as well), and burn your "LIVE" Ubuntu CD.

  • ImgBurn has it's own support forum with a link to them on it's home page, if you need it.
3) Setup the CD:
  • Set the Live CD into the CD Drive, and reboot. If you see a Ubuntu logo before you reboot, just ignore it; go
    ahead with the reboot.
4) Answer the Set Up Questions.
  • Ubuntu will reboot your rig when done. Remember your username and password! Everything in Linux is case sensitive, including passwords and filenames.

  • If set up fails, be sure to write down the error message. The Ubuntu forums are helpful and found here: http://www.ubuntuforums.org/, and of course, both our forum and the FAH forum can help with both Ubuntu Linux 64 bit and the SMP client. The FAH forum is at: http://forum.folding-community.org/f...-linux-64.html

  • If you can't boot up from the CD drive , you may need to change your boot up sequence in your BIOS. You need
    the CD drive to boot *before* the HD.
5 ) Get Ubuntu Updates:
  • Connect the rig to the internet and be patient. Ubuntu will discover that connection, shortly. Below and inside the date/time display in the upper right hand side, you'll see a balloon message appear in a few minutes, telling you "updates are available". Click on the update icon to install them. Click on the update icon, and let Ubuntu, do it's updating.
6) Get the 32 bit Libraries:
  • Click on the Ubuntu Desktop "Applications" tab, and choose "Accessories", then "Terminal" to open a terminal window to work in. Carefully keyboard in at the prompt: "sudo apt-get install ia32-libs", with no quotation marks, and press enter. You will be asked to log in, with your username and password. You'll be asked about specific
    32 bit libraries, and using up disk space. Just answer yes to those questions.

  • If you have installed the 32 bit version of Ubuntu by mistake, you'll get the error: "This client only supports
    64 bit Linux machines. Your machine was detected as i686 (or whatever)." You'll need to go back and d/l the
    correct 64 bit version mentioned in step #1, above.
7) Create and Change into, the FAH Directory:
  • Open a Terminal Window (click on the "Applications" tab, then select "Terminal"). Enter each of these lines in the terminal window, exactly:

    mkdir -p ~/FAH
    cd ~/FAH

    Now your /FAH directory is made, and you are in the FAH directory.
8) Get the FAH SMP Client:
9) Extract the Compressed File:
  • Click on "Applications", "Accessories", then "Archive Manager". Double click on the FAH directory. Select the FAH compressed file icon; then click on the "Extract" button to extract it into that directory.
10) Start the FAH SMP Client:
  • In the terminal window, enter: "./fahN -smp -forceasm -verbosity 9", where "N" is the number of fah's smp client (fah6, etc.), (with no quotes - this is Stanford's recommended flags for their SMP client). SMP should not be capitalized in the startup string. Linux is totally case sensitive, so -SMP won't work.

  • Enter your name, team number 32, etc. You must choose "yes" to the big packets question to participate in the project, since all the WU's are large. There are no WU's w/o deadlines, available, so you must answer no to deadlineless WU's if you want to fold.

  • If you get an error message about not having permission to run that file, then enter this in the terminal window:

    chmod +x fahN (where N is the number of the fah client version).

    Then press the up arrow key, and your previously typed command will reappear in the terminal window. Hit enter.
11) Stopping the SMP Client:
  • Click anywhere on the Terminal Window, then press Ctrl + c (hold down Ctrl and press c). This is the safe way to stop the SMP client and prevent possible loss of work. Always give the client a dozen seconds or so, to stop the core threads. You'll see a few error messages from those threads - just ignore them.

  • Next time you want to fold, (like from a reboot), you will be in your home directory. Just open a Terminal Window,(click on the Applications tab, and select Terminal), and change to the /FAH directory (folder), with the entered command: "cd ~/FAH" (no quotes), and then enter:"./fah6 -smp -forceasm -verbosity 9" (again, don't type the quotation marks).
12) SMP Note:
  • You must add the -smp startup option, if you want to fold SMP work units.
13) Power Saving Settings for Folding:
  • Turn off four power saving settings, to keep your Ubuntu system folding.

  • In the BIOS: the ACPID (sometimes they have other "Green" or "power saving" options, as well. I turn them off and save that setting.)

  • In Ubuntu: System >> Preferences >> Power Management. Shows two slider controls, one is for the monitor, and the second one for the computer system. Slide the one for the computer system, to "Never".

  • System >> Service Settings >> CPU. Make sure to uncheck these two service boxes: Frequency Monitor and Power Management (ACPID).

    As long as Ubuntu runs great w/o the updates, I don't bother updating much.
Important Notes:
  • If you want to dual boot Windows and Ubuntu, you must always install Windows before Ubuntu.

  • If your keyboard doesn't work during boot-up, turn on legacy USB support in your BIOS.

  • On some mobo's, the IDE HD settings are "cranky". If your IDE HD has problems booting up in Ubuntu, (e.g.: the CD drive *will* boot OK, if it has the Live CD, but the HD won't boot up, even when the CD drive is empty) - First, check your boot sequence in your BIOS. Make sure the HD is second or third on the list of boot up devices, but that it IS on the list. Then, try switching the jumper settings on the HD to "slave" and be sure the IDE HD is on the "master" connector of the IDE cable.

    Subsequent reboots are then fine, just leave the HD IDE jumper settings on "slave", even though it's the only device now on the IDE cable (in my two Linux SMP rigs), and it's on the "master" connector of the IDE cable.

    SATA HD's, had no such annoying problem - clean all the way through the install. I have learned this is due to the weird way the 965 and 975 chipsets handle IDE device detection.
 
Installing Folding@Home: SMP/XP/Vista; GPU2 Win/Lin; SMP/VM; SMP/Lin; MultiGPU

OK, this is my first attempt at a guide, so it may be missing stuff and I'm certain it will be ugly (at least to start). There seems to have been a lot of interest in this, but a lot of questions. Here goes.

How to set up Notfred's VMWare Virtual Appliance with VMWare Player.

1. Obtain and install VMWare Player. (VMWare) (Filehippo) Filehippo doesn't require registration. I think the only option during install is the install directory. Other than that, any good firewall will probably pop up asking if you want to allow the newly added virtual network cards to have access to your computer or LAN. Make sure you allow these.

2. Obtain the virtual appliance image. (link)

3. Open the zip containing folding.vmdk and folding.vmx. Extract these to whatever directories you want to use, say C:\folding\vm for example. If you have a quadcore and are planning to use 2 VMs with static IP addresses (suggested, for monitoring purposes), name it something like vm1 and make a copy of it and call the second directory vm2. If you are using DHCP you can copy it AFTER you make the configuration changes in step 8.

4. (Optional) for management purposes, you may want to change the name of the VM. Right click on the .vmx file and open it with wordpad. Where it says displayName = "Folding@Home", you can change what is in the quotes to whatever you want to help you keep track of which is which if you have a quadcore and are running 2 VMs. You need to do this for both directories.

5. You can now run the virtual machine by double clicking the .vmx file or by opening it through VMWare Player. (My virtual machines randomly stopped working by opening the .vmx file and I now have to run VMWare Player as Administrator, then open the virtual machine) At this point it will boot up and detect your architechture and launch the appropriate configuration. Assuming it has access to the internet1, it will download what it needs and start folding (under notfred's username).

6. When the VM boots up, take note of the IP address given on the console. Now go to your web browser and go to http://<IP address of VM>. It will bring up the status page. Click "Reconfigure this host and any USB drives". This page is where you will configure your VM.

7. Configure it however you'd like. Remember to change the username and team! Here are some of the options that might not be obvious.
  • SMP Instance per - This is how many CPUs to use. I don't think there's any point in using more than 2, as VMWare Player won't use them.
  • Remote Reboot - This enables a link on the status page that will let you reboot the machine.
  • Install to USB drives on boot - When the VM boots it will try to install to a USB drive for use on another computer or on the same computer for diskless folding. I've never messed with this, so I don't know if it works.
  • Console blank time - Simply blanks the VM's window.
  • Windows Networking - This will enable samba file sharing on the VM, so you can browse its files from the computer it's running on.
  • Login shell - This enables you to login from the VM to run commands. It's very limited and you probably won't need it, but it doesn't hurt to enable it.

8. Click reconfigure. It will tell you it has to reboot. Let it do its thing. After a few seconds it will be back up and folding under your name. You can double check this on the console in the area marked in blue on the picture below.

9. Repeat 4 - 9 if you have another static IP VM to set up. If you used DHCP, now would be the time to make a copy of the first VM and get it up and running.

1 If it doesn't have access to the internet, try switching between bridged and NAT and rebooting the VM. You can switch between bridged and NAT by right clicking the two computes in the bottom of the VMWare Player window. This is circled in red in the image below. Also make sure your firewall is allowing it out. It will probably ask you if you want to allow it's virtual network cards when you install VMWare Player.

Some visual clarification:
notfred-tut.jpg


OK, now the information for the guide is here. I just gotta look at other people's guides to get an idea how to pretty it up.
 
Windows 7(Beta) GPU notes on installing and Networking.

Gpu client for Windows 7(Beta)Some of these should be done for the other Clients used in
Windows 7(beta) as well.

Before starting GPU installation.

1. In control panel select "Folder Options" View tab in Advanced options check the "the

show hidden folders" box.

2. Also In Control panel in "Power options" in "Change Plan settings" for Hard drive
select never. So it doesn't shut off.

3. Follow the Win XP/Vista directions for installing.

Note on the Deino install, Number 9 should read:

9) You are now asked if you want to store the credentials in the registry or hard drive. Select Registry (just hit enter)

If you have a USB drive plugged in ,then that will be first in the list, so choose the appropriate number for registry and then hit enter
.


The Gpu client will install in C/Users/"YourUsername"/AppData/Roaming/Folding@HomeGpu
(If you did not unhide it the AppData folder will be hidden).

It automatically added the exe shortcut to startup so if you do not want the client to start on boot, remove it.


Also to monitor the client across your network including Win XP and Vista:

4. In Control Panel Select System and click the Advanced System settings tab

Give the rig a description

Click the "change" box to rename your workgroup.

Make it whatever your network workgroup name is for example "MSHOME"

You will need to restart.

You should be able to see all your other machines and monitor the Folding@Homegpu

client.
 
Last edited:
yes it is free VMware Server you just have to set up a log in account and register like do on this Forum then you can get the Licences get a few in case you wish to Put on multiple PC,s
 
ok so do big, normal, and small work units end up giving different PPD? i think I remember seeing somewhere that this originated back when 512mb was a lot of ram, so choosing "big" now-a-days is more dependent on your internet connection (if you can download >10mb in a reasonable amount of time). thoughts?
 
ok so do big, normal, and small work units end up giving different PPD? i think I remember seeing somewhere that this originated back when 512mb was a lot of ram, so choosing "big" now-a-days is more dependent on your internet connection (if you can download >10mb in a reasonable amount of time). thoughts?

IIRC on the Xeons I get better PPD running:

749pt > 119pt > 84pt/47pt > 225pt

(to a rough approximation, the rig is only on 12-14 hrs/day so it may simply be that the 47 and 84 pt ones can complete with only one 'off period' wheras the others have a longer 'off period')
 
sorry david, i'm confused as to whether that answered my question or not. Lets say some one has a 1st gen C2D, like a 6400 or something and 2gb ram and a regular cable connection. Would they get a PPD benefit by choosing "big" vs "normal"?
 
A typo in the SMP/VMware guide by Leelegend:

GET IT RUNNING WITH:
./fah5 - needs to be run each time you load linux (unless you setup a autorun)

should be ./fah6

It may not be a typo, rather, outdated instructions, but it won't work if followed.

I still think the line that says:

4. Load VMWare and create a new virtual machine (wizard), select "other" option and select "other 64bit" from the drop down.

Should say:

4. Load VMWare and create a new virtual machine (wizard), select "Linux" option and select "Ubuntu 64bit" from the drop down.
 
Hey....I have gone through the guide and apparently there doesnt seem to be a GPU client for Ati cards...... need some help plz
 
Back