- Joined
- May 15, 2006
Multi nVidia GPU Folding Walkthrough
Welcome to the Multi GPU folding walkthrough! My name is Thideras and I will be your guide, today we will be touring the majestic lands of GPU folding! This territory has only been recently discovered and is still very new to many people. Please sit back and relax as we continue our guide.
What you will need:
1) A computer with two or more nVidia GPU's (8800 or newer)
2) Internet connection
3) A serious amount of air conditioning for the room the computer will be in
4) This guide
-------------------------------------------------
Drivers:
I get my drivers from LaptopVideo2Go.com. He does a very good job in updating the drivers and getting them out quickly.
XP 32bit 177.35
XP 64bit 177.35
Vista 32bit 177.35
Vista 64bit 177.35
You will need to download the drivers AND the modified INF file on that page. When the drivers download, run the .exe (it is an extraction program) and it will create a folder on the desktop (example: 177.35_winxp64). Place the modified INF file in the folder, overwriting the existing one. Run the installer normally (setup.exe in the extracted folder) and reboot your computer.
-------------------------------------------------
Setting up:
You will first need two monitors (or one if you don't mind rebooting) to setup the cards and get them overclocked and configured for the folding client. Use Rivatuner along with RTHDRIBL to determine the max shader overclock for the cards. You only need to overclock the shaders, I have found that more core or memory speed does not help, it just adds heat. I suggest using RTHDRIBL over Furmark since you can specify what GPU it uses to render (File<Config Display<Display Adapter) and speeds up testing quite a bit.
Once you find the max shader overclock for each card, check the box (for each GPU) to set that overclock during startup.

You can now remove the second monitor (if you used one) and restart. Please make sure to check the settings stuck after the restart and that you only have 1 screen enabled and 1 disabled. You can check that by right clicking on the desktop, click Properties and go to the last tab. One should be solid and another grayed out.

If that is good, move on to the next section!
-------------------------------------------------
Downloading and installing the client:
Since we have all the cards setup, we need to download and install the client. Please download the client, 1.07 core and FAHMon:
F@H GPU Client
FAHMon
Download all three and run the F@H GPU Client's install. There is nothing you can change during the install, so no pictures needed. The program installs to "C:\Program Files\Folding@home\Folding@home-gpu" if you are on a 32bit system and "C:\Program Files (x86)\Folding@home\Folding@home-gpu" if you are on a 64bit system. At this time, DO NOT run anything in this folder, we have quite a bit more to configure.
Right click on the "[email protected]" file and select Send to<Desktop. Do that TWICE so we have duplicate shortcuts on the desktop.

We should now have two shortcuts on the desktop, let us rename them to "GPU1" and "GPU2" to keep it simple.

-------------------------------------------------
Configure shortcuts and folders:
Once you restart, you should have the F@H control panel window come up. We do not want to configure this right now, so go to the bottom right (next to the clock) and right click on the GPU Client icon and select "Quit". Go to Start<All Programs<Startup, right click on the "Folding@home-gpu" shortcut and delete it, this will prevent it from starting up the wrong way.
Create two folders on the C: drive labeled "GPU1" and "GPU2". These folders will be used as the "Start in" folder for the shortcuts that will will configure next.

Back on the desktop, right click the "GPU1" shortcut and select Properties. In the "Target" box, leave the path the way it is but put your cursor AFTER the last double quote. Press your space bar one and type "-gpu 0 -verbosity 9 -local", do not put the "s that I have added. Change the "Start in" path to "C:\GPU1", leave the "s that I put in. It should look like this:

Hit OK once you have finished changing the two boxes. Right click on the "GPU2" shortcut on the desktop and click on "Properties". In the "Target" box, leave the path the way it is but put your cursor AFTER the last double quote. Press your space bar one and type "-gpu 1 -verbosity 9 -local", do not put the "s that I have added. Change the "Start in" path to "C:\GPU2", leave the "s that I put in. It should look like this:

-------------------------------------------------
FAHMon setup:
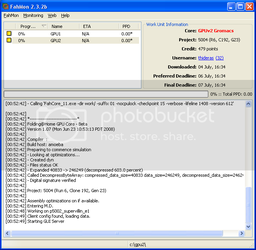
Since we have the folders created, we can now move onto the FAHMon installation and configuration. Install FAHMon from the exe that we downloaded earlier and run it from its shortcut. Right click in the list box and select "Add a new client". Give it the name "GPU1" and the location of "C:\GPU1" then hit OK. Right click in the list box again and select "Add a new client". Give it the name "GPU2" and the location of "C:\GPU2". You might notice that they show up as black squares, this is normal for now since there is no log in those folders yet. Go up to "Monitoring" and click "Show/Hide FAHLog", this will enable easier monitoring once we start each client. Your window should now look like this:

We will be using the following shortcuts quite a bit in the next section:
Reload selected client - F5
Reload all clients - F6
-------------------------------------------------
Copying the final files:
We have to copy a few files over so that the client can run properly. Open up the folder "C:\Documents and Settings\<username>\Application Data\Folding@home-gpu", please note that you must turn on viewing of system files and folder (Tools<Folder Options<View) before that folder is visible. There will be 3 files that we need to copy (and ONLY these 3!):

Copy those 3 files and paste them in C:\GPU1 and C:\GPU2...DO NOT skip this step, the client will not run without them.
Once you have all 3 files in each of the folders (C:\GPU1 and C:\GPU2), proceed onto the next step.
-------------------------------------------------
Running GPU1:
Since we now have everything configured except the actual client itself, we can attempt to run it! Using the shortcut we created on the desktop (very important!), double click the GPU1 shortcut. It may take a second or two, but we should get a screen labeled "Folding@home Control Panel". Fill in the username and team number. Go to the Connection tab and check the box that says "Allow receipt of work assignments and return of results greater than 10MB in size". Go to the advanced tab and check the box that says "Do NOT lock cores to specific CPU". At this time, the non-cpu locking feature is broken, although when they fix it, you will already have it setup.
Switch back to FAHMon and select GPU1 in the list and start smashing the F5 key so you can watch the client start! It should show info like this:
If it does, GREAT! That means it is working! If not, please review all the steps to make sure you didn't miss anything! Please leave the client running to make sure that the second one is using the second card.
GPU1 is configured!
-------------------------------------------------
Running GPU2:
Since we now have everything configured except the actual client itself, we can attempt to run it! Using the shortcut we created on the desktop (very important!), double click the GPU2 shortcut. It may take a second or two, but we should get a screen labeled "Folding@home Control Panel". Fill in the username and team number. Go to the Connection tab and check the box that says "Allow receipt of work assignments and return of results greater than 10MB in size". Go to the advanced tab and check the box that says "Do NOT lock cores to specific CPU". At this time, the non-cpu locking feature is broken, although when they fix it, you will already have it setup.
Switch back to FAHMon and select GPU2 in the list and start smashing the F5 key so you can watch the client start! It should show info like this:
GPU2 is configured!
Welcome to the Multi GPU folding walkthrough! My name is Thideras and I will be your guide, today we will be touring the majestic lands of GPU folding! This territory has only been recently discovered and is still very new to many people. Please sit back and relax as we continue our guide.
What you will need:
1) A computer with two or more nVidia GPU's (8800 or newer)
2) Internet connection
3) A serious amount of air conditioning for the room the computer will be in
4) This guide
-------------------------------------------------
Drivers:
I get my drivers from LaptopVideo2Go.com. He does a very good job in updating the drivers and getting them out quickly.
XP 32bit 177.35
XP 64bit 177.35
Vista 32bit 177.35
Vista 64bit 177.35
You will need to download the drivers AND the modified INF file on that page. When the drivers download, run the .exe (it is an extraction program) and it will create a folder on the desktop (example: 177.35_winxp64). Place the modified INF file in the folder, overwriting the existing one. Run the installer normally (setup.exe in the extracted folder) and reboot your computer.
-------------------------------------------------
Setting up:
You will first need two monitors (or one if you don't mind rebooting) to setup the cards and get them overclocked and configured for the folding client. Use Rivatuner along with RTHDRIBL to determine the max shader overclock for the cards. You only need to overclock the shaders, I have found that more core or memory speed does not help, it just adds heat. I suggest using RTHDRIBL over Furmark since you can specify what GPU it uses to render (File<Config Display<Display Adapter) and speeds up testing quite a bit.
Once you find the max shader overclock for each card, check the box (for each GPU) to set that overclock during startup.
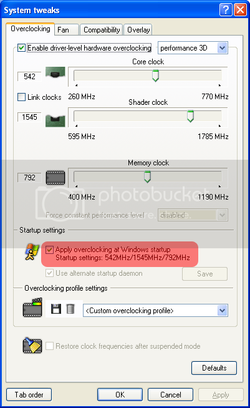
You can now remove the second monitor (if you used one) and restart. Please make sure to check the settings stuck after the restart and that you only have 1 screen enabled and 1 disabled. You can check that by right clicking on the desktop, click Properties and go to the last tab. One should be solid and another grayed out.
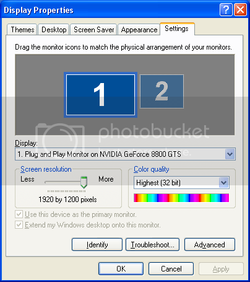
If that is good, move on to the next section!
-------------------------------------------------
Downloading and installing the client:
Since we have all the cards setup, we need to download and install the client. Please download the client, 1.07 core and FAHMon:
F@H GPU Client
FAHMon
Download all three and run the F@H GPU Client's install. There is nothing you can change during the install, so no pictures needed. The program installs to "C:\Program Files\Folding@home\Folding@home-gpu" if you are on a 32bit system and "C:\Program Files (x86)\Folding@home\Folding@home-gpu" if you are on a 64bit system. At this time, DO NOT run anything in this folder, we have quite a bit more to configure.
Right click on the "[email protected]" file and select Send to<Desktop. Do that TWICE so we have duplicate shortcuts on the desktop.
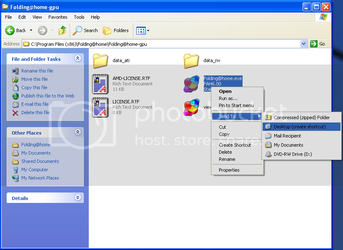
We should now have two shortcuts on the desktop, let us rename them to "GPU1" and "GPU2" to keep it simple.

-------------------------------------------------
Configure shortcuts and folders:
Once you restart, you should have the F@H control panel window come up. We do not want to configure this right now, so go to the bottom right (next to the clock) and right click on the GPU Client icon and select "Quit". Go to Start<All Programs<Startup, right click on the "Folding@home-gpu" shortcut and delete it, this will prevent it from starting up the wrong way.
Create two folders on the C: drive labeled "GPU1" and "GPU2". These folders will be used as the "Start in" folder for the shortcuts that will will configure next.
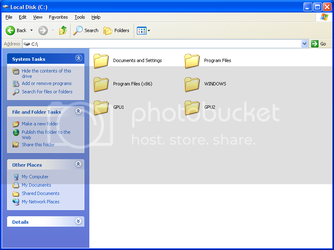
Back on the desktop, right click the "GPU1" shortcut and select Properties. In the "Target" box, leave the path the way it is but put your cursor AFTER the last double quote. Press your space bar one and type "-gpu 0 -verbosity 9 -local", do not put the "s that I have added. Change the "Start in" path to "C:\GPU1", leave the "s that I put in. It should look like this:
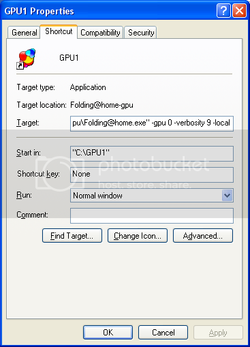
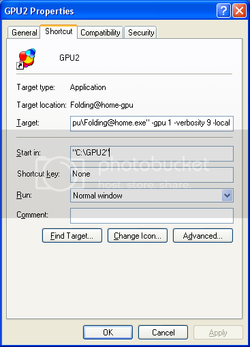
Hit OK once you have finished changing the two boxes. Right click on the "GPU2" shortcut on the desktop and click on "Properties". In the "Target" box, leave the path the way it is but put your cursor AFTER the last double quote. Press your space bar one and type "-gpu 1 -verbosity 9 -local", do not put the "s that I have added. Change the "Start in" path to "C:\GPU2", leave the "s that I put in. It should look like this:
-------------------------------------------------
FAHMon setup:
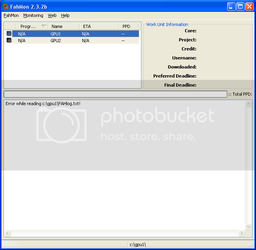
Since we have the folders created, we can now move onto the FAHMon installation and configuration. Install FAHMon from the exe that we downloaded earlier and run it from its shortcut. Right click in the list box and select "Add a new client". Give it the name "GPU1" and the location of "C:\GPU1" then hit OK. Right click in the list box again and select "Add a new client". Give it the name "GPU2" and the location of "C:\GPU2". You might notice that they show up as black squares, this is normal for now since there is no log in those folders yet. Go up to "Monitoring" and click "Show/Hide FAHLog", this will enable easier monitoring once we start each client. Your window should now look like this:
We will be using the following shortcuts quite a bit in the next section:
Reload selected client - F5
Reload all clients - F6
-------------------------------------------------
Copying the final files:
We have to copy a few files over so that the client can run properly. Open up the folder "C:\Documents and Settings\<username>\Application Data\Folding@home-gpu", please note that you must turn on viewing of system files and folder (Tools<Folder Options<View) before that folder is visible. There will be 3 files that we need to copy (and ONLY these 3!):
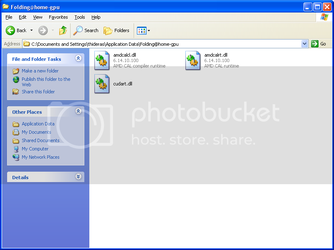
Copy those 3 files and paste them in C:\GPU1 and C:\GPU2...DO NOT skip this step, the client will not run without them.
Once you have all 3 files in each of the folders (C:\GPU1 and C:\GPU2), proceed onto the next step.
-------------------------------------------------
Running GPU1:
Since we now have everything configured except the actual client itself, we can attempt to run it! Using the shortcut we created on the desktop (very important!), double click the GPU1 shortcut. It may take a second or two, but we should get a screen labeled "Folding@home Control Panel". Fill in the username and team number. Go to the Connection tab and check the box that says "Allow receipt of work assignments and return of results greater than 10MB in size". Go to the advanced tab and check the box that says "Do NOT lock cores to specific CPU". At this time, the non-cpu locking feature is broken, although when they fix it, you will already have it setup.
Switch back to FAHMon and select GPU1 in the list and start smashing the F5 key so you can watch the client start! It should show info like this:
Code:
--- Opening Log file [July 5 00:34:20]


# Windows Console GPU Edition #################################################
###############################################################################

                       Folding@Home Client Version 6.12beta8

                          http://folding.stanford.edu

###############################################################################
###############################################################################

Launch directory: C:\GPU1
Arguments: -gpu 0 -verbosity 9 -local

[00:34:32] - Ask before connecting: No
[00:34:32] - User name: thideras (Team 32)
[00:34:32] - User ID: 23B9894D0054EBD8
[00:34:32] - Machine ID: 1
[00:34:32]
[00:34:32] Work directory not found. Creating...
[00:34:32] Could not open work queue, generating new queue...
[00:34:32] Initialization complete
[00:34:32] + Benchmarking ...
[00:34:32] - Preparing to get new work unit...
[00:34:32] + Attempting to get work packet
[00:34:32] - Autosending finished units...
[00:34:32] Trying to send all finished work units
[00:34:32] + No unsent completed units remaining.
[00:34:32] - Autosend completed
[00:34:32] - Will indicate memory of 2046 MB
[00:34:32] - Detect CPU. Vendor: GenuineIntel, Family: 6, Model: 15, Stepping: 11
[00:34:32] - Connecting to assignment server
[00:34:32] Connecting to http://assign-GPU.stanford.edu:8080/
[00:34:32] Posted data.
[00:34:32] Initial: 40AB; - Successful: assigned to (171.64.65.20).
[00:34:32] + News From Folding@Home: GPU folding beta
[00:34:33] Loaded queue successfully.
[00:34:33] Connecting to http://171.64.65.20:8080/
[00:34:34] Posted data.
[00:34:34] Initial: 0000; - Receiving payload (expected size: 41345)
[00:34:34] Conversation time very short, giving reduced weight in bandwidth avg
[00:34:34] - Downloaded at ~80 kB/s
[00:34:34] - Averaged speed for that direction ~80 kB/s
[00:34:34] + Received work.
[00:34:34] + Closed connections
[00:34:34]
[00:34:34] + Processing work unit
[00:34:34] Core required: FahCore_11.exe
[00:34:34] Core found.
[00:34:34] Working on queue slot 01 [July 5 00:34:34]
[00:34:34] + Working ...
[00:34:34] - Calling 'FahCore_11.exe -dir work/ -suffix 01 -nocpulock -checkpoint 15 -verbose -lifeline 976 -version 612'

[00:34:35]
[00:34:35] *------------------------------*
[00:34:35] Folding@Home GPU Core - Beta
[00:34:35] Version 1.07 (Mon Jun 23 10:53:13 PDT 2008)
[00:34:35]
[00:34:35] Compiler  :
[00:34:35] Build host: amoeba
[00:34:35] Preparing to commence simulation
[00:34:35] - Looking at optimizations...
[00:34:35] - Created dyn
[00:34:35] - Files status OK
[00:34:35] - Expanded 40833 -> 246249 (decompressed 603.0 percent)
[00:34:35] Called DecompressByteArray: compressed_data_size=40833 data_size=246249, decompressed_data_size=246249 diff=0
[00:34:35] - Digital signature verified
[00:34:35]
[00:34:35] Project: 5004 (Run 6, Clone 192, Gen 23)
[00:34:35]
[00:34:35] Assembly optimizations on if available.
[00:34:35] Entering M.D.
[00:34:41] Working on p5002_supervillin_e1
[00:34:42] Client config found, loading data.
[00:34:42] Starting GUI ServerGPU1 is configured!
-------------------------------------------------
Running GPU2:
Since we now have everything configured except the actual client itself, we can attempt to run it! Using the shortcut we created on the desktop (very important!), double click the GPU2 shortcut. It may take a second or two, but we should get a screen labeled "Folding@home Control Panel". Fill in the username and team number. Go to the Connection tab and check the box that says "Allow receipt of work assignments and return of results greater than 10MB in size". Go to the advanced tab and check the box that says "Do NOT lock cores to specific CPU". At this time, the non-cpu locking feature is broken, although when they fix it, you will already have it setup.
Switch back to FAHMon and select GPU2 in the list and start smashing the F5 key so you can watch the client start! It should show info like this:
Code:
--- Opening Log file [July 5 00:38:08]


# Windows Console GPU Edition #################################################
###############################################################################

                       Folding@Home Client Version 6.12beta8

                          http://folding.stanford.edu

###############################################################################
###############################################################################

Launch directory: C:\GPU2
Arguments: -gpu 1 -verbosity 9 -local

[00:38:19] - Ask before connecting: No
[00:38:19] - User name: thideras (Team 32)
[00:38:19] - User ID: 23B9894D0054EBD8
[00:38:19] - Machine ID: 2
[00:38:19]
[00:38:19] Work directory not found. Creating...
[00:38:19] Could not open work queue, generating new queue...
[00:38:20] Initialization complete
[00:38:20] + Benchmarking ...
[00:38:20] - Preparing to get new work unit...
[00:38:20] + Attempting to get work packet
[00:38:20] - Autosending finished units...
[00:38:20] Trying to send all finished work units
[00:38:20] + No unsent completed units remaining.
[00:38:20] - Autosend completed
[00:38:20] - Will indicate memory of 2046 MB
[00:38:20] - Detect CPU. Vendor: GenuineIntel, Family: 6, Model: 15, Stepping: 11
[00:38:20] - Connecting to assignment server
[00:38:20] Connecting to http://assign-GPU.stanford.edu:8080/
[00:38:20] Posted data.
[00:38:20] Initial: 40AB; - Successful: assigned to (171.64.65.20).
[00:38:20] + News From Folding@Home: GPU folding beta
[00:38:20] Loaded queue successfully.
[00:38:20] Connecting to http://171.64.65.20:8080/
[00:38:22] Posted data.
[00:38:22] Initial: 0000; - Receiving payload (expected size: 41345)
[00:38:22] Conversation time very short, giving reduced weight in bandwidth avg
[00:38:22] - Downloaded at ~80 kB/s
[00:38:22] - Averaged speed for that direction ~80 kB/s
[00:38:22] + Received work.
[00:38:22] + Closed connections
[00:38:22]
[00:38:22] + Processing work unit
[00:38:22] Core required: FahCore_11.exe
[00:38:22] Core found.
[00:38:22] Working on queue slot 01 [July 5 00:38:22]
[00:38:22] + Working ...
[00:38:22] - Calling 'FahCore_11.exe -dir work/ -suffix 01 -nocpulock -checkpoint 15 -verbose -lifeline 1792 -version 612'

[00:38:23]
[00:38:23] *------------------------------*
[00:38:23] Folding@Home GPU Core - Beta
[00:38:23] Version 1.07 (Mon Jun 23 10:53:13 PDT 2008)
[00:38:23]
[00:38:23] Compiler  :
[00:38:23] Build host: amoeba
[00:38:23] Preparing to commence simulation
[00:38:23] - Looking at optimizations...
[00:38:23] - Created dyn
[00:38:23] - Files status OK
[00:38:23] - Expanded 40833 -> 246249 (decompressed 603.0 percent)
[00:38:23] Called DecompressByteArray: compressed_data_size=40833 data_size=246249, decompressed_data_size=246249 diff=0
[00:38:23] - Digital signature verified
[00:38:23]
[00:38:23] Project: 5004 (Run 6, Clone 192, Gen 23)
[00:38:23]
[00:38:23] Assembly optimizations on if available.
[00:38:23] Entering M.D.
[00:38:29] Working on p5002_supervillin_e1
[00:38:30] Client config found, loading data.
[00:38:30] Starting GUI Server
Last edited:
