- Joined
- Sep 27, 2003
g0dM@n's
IHS Removal Tutorial 101
If you have already removed your IHS, please post your before and after temps, and CPU model (as well as core/socket, and method of cooling) to help others understand the advantages.
Caution:
Introduction and FAQ:
I've helped several people take off IHSs so far. Not to put anyone else's down in ANY way, but it definitely works flawlessly (keeping in mind you don't go too deep. That's the only worry with my technique... well, that would be the worry with any technique).
Q. First thing's first - What is an IHS?
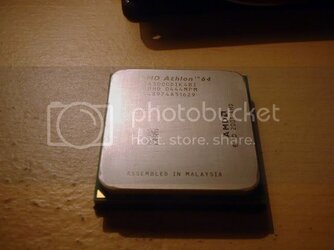
A. An IHS is an Integrated Heat Spreader. IIRC, its main purpose is to protect the die, which in most cases ranges from 90nm to 130nm. The IHS is over double the size and takes the pressure from your cooler and universally spreads it across [so to speak] the entire CPU. Think of its purpose almost the same as a shim. They serve primarily as a protection of your component.
The IHS basically EXPANDS the surface area of the die. In almost no way does it help dissipate heat better. It's expanding the surface area to help remove pressure from a smaller area.
Ask yourself this: Would it hurt more to stand on the tip of a needle or to stand on the tip of a 1 inch thick pole? Both would hurt, but the needle will most likely puncture. This is very basic (don't laugh), but I'm basically showing you how the same amount of mass (your body weight) acts differently on both objects. This is basically because the needle has a lot less surface area on the tip.
So there you have it... the larger the area of something, the less pressure it will withstand per square nm (nanometer, or any measurement of area for the matter).
Because of the fact that removing an IHS will create a LOT more pressure on the die, you need to take into effect the risks involved. I personally recommend getting something similar to the Athlon XPs. If any of you have seen an Athlon XP, you will know that it has 4 small, black pads surrounding the die. They are there to remove unnecessary pressure from the die, so that it is not crushed.
I will soon post pix of what I've done and what you can obtain to use in the same manner as the Athlon XPs.
Q. Why should I remove my IHS?
A. You don't have to. The reason why many people do it is because they are 'overclockers'. Now, no one is trying to demean you if you don't do this. Think of it as this... some people do watercooling, and some people don't. Some people think it's worth the risk and some people don't. This is simply the same situation.
IF YOU REMOVE YOUR IHS AND DO IT PROPERLY, I GUARANTEE THAT YOUR TEMPERATURES WILL DROP WITHOUT ANY DOUBT!
Wait a second, why so - why doesn't EVERYONE do this? Well, don't forget... THE RISKS! You can say goodbye to your CPU in a matter of seconds, whether it be a $100 CPU, $200, $300, or whatever, you will NOT be happy to crush it. Once crushed, it's impossible to get it back.
In the case where you decided to remove your IHS, I will say that IN MOST CASES your temperature will drop AT LEAST 5C off of load temps.
Believe me when I tell you, I removed an IHS off of an Opteron 148. My load temp dropped from 54-56C (watercooling) to about 36-38C. That was roughly an 18C drop. Most IHS removals will NOT yield results like mine. My guess is that my IHS was just a poorly mounted one. This may happen to you, and you may actually be reading this for the sole reason of being one of those individuals.
Q. How long will this take?
A. Remember, I said BE PATIENT! I can do it in 60 seconds with ease, but that is more risky than spending 10 minutes. This is just a personal recommendation... I say make it last 5-10 minutes. It's a long time to cut a small object, but in 5-10 minutes you could be saving yourself $100-1000, depending on the pricetag of your chip.
If you think of any other Frequently Asked Questions, please refer them to me and I will keep it updated.
The Procedure:
Just to clear things up... I AM NOT RESPONSIBLE IF ANYTHING GOES BAD!! I'm just giving advice.
**TAKE YOUR TIME!!!!!!!**
First thing's first... you're gonna use a razor cuz it's thinner than a knife.
Second, only cut with the razor in parallel to the CPU. Don't tilt it in any way (I made that mistake and scratched the PCB of my CPU a bit, although it still works fine...
Third, make sure you put some sort of cushining under the CPU pins before you put it on a table-top. I made this mistake and bent my pins, and spent 10min fixing it back. You can use the black spongy stuff the CPU came on when you bought it (both OEM and RETAIL pack the CPU the same way).
Fourth, start cutting on one of the 4 corners into the black gooey stuff. Sway the razor side to side until it slips in under the IHS. Once you're in deep enough you'll feel it (DON'T GO TOO DEEP OR YOU'LL CUT A TRANSISTOR). After you feel that, you just drag the razor around the entire IHS until it finally pops off. Have you ever cut paper with scissors, where after the first cut with the scissors you just slide scissor down the paper til it reaches the end? That's what you do with the razor. At least that's how I did it and thought it was easy. It's better than slicing the whole time... just once you're in, slide the razor the rest of the way.
Hope this helps... BE PATIENT!! TAKE YOUR TIME!!!
Recommended Cutting Razor:
My razor is not double-sided. It's the type of razor that you place into the replaceable box cutter razors. It's single-sided, and on the other side it has a support - this way the razor doesn't bend.

It definitely isn't a good one to remove epoxied heatsinks, though... cuz that support on the other side of the blade is a tad bit too thick and makes it hard to maneuver by a video card ram chip (yes, I've screwed up b4).
The double-sided, or a UNIVERSALLY THIN blade would be best to remove epoxied heatsinks.
You may also use dental floss for IHS removal, but I've never tried that. I don't think I'd have to explain how to use dental floss... basically get it under the IHS and attempt to slice away.
Mounting a Cooler that Uses the Motherboard Bracket:
**Before you even get into mounting the heatsink, either CLEAR CMOS or reset your CPU in bios to optimal STOCK VOLTAGE settings. All temperatures I use here are based on STOCK VOLTAGES for a single-core chip. Add 2-4C for dual-core**
After the IHS is off, approximate the depth of the IHS - from the top of the IHS where the info is to the other side, where it touched the die of the CPU. Don't measure the edge of it because it is thicker than the center of it.
This is the exact measurement that you will need to shave down the mobo's bracket. The mobo's bracket should have 4 round corners, as well as the 2 grooves where the screws mount into. All 6 of those need to be shaved down to your approximate measurement. The more you shave, the tighter the heatsink will mount to your CPU, so BE CAREFUL! Use your judgement!
It may be smart to shave less, rather than more, and then do trial and error. If you shave a tad bit too little, trust me you won't harm your CPU (considering you don't CRUSH by a mismount). As long as the heatsink makes decent contact, your temps won't sky rocket.
Any time you do mount the heatsink to the chip after shaving, power on the PC, and GET INTO BIOS!! Quickly go to check your CPU temp to see if it's idling at no more than 35-38C. If it's idling over 38C, you most likely didn't mount the heatsink properly, or didn't shave the mobo bracket enough. Shave a bit more, UNIVERSALLY on each extended piece (each of the 6 pieces).
If your temp is less than or equal to 38C idle, restart and boot into your OS. Prepare to quickly check your temp again. If it's < 40C after everything is loaded and idle, run a stress test (prime 95 high power consumption would be a good one), and check your temps. If you broke 45C, then my guess is it's a bad mount. I would say that 35-40C MAX would be ideal for stock voltage LOAD temps.
Remember, everything I speak of here is running at stock voltages. Now, if your room is hot, don't use my temps as reference... you're on your own with distinguishing the differences. Also, the same goes for extremely bad case temps.
Ideally, at stock voltage, you shouldn't break 40C load with any cooler. If you do, you most likely have a bad mount or didn't shave the mobo bracket enough... or... any of the other POOR cooling reasons, such as: too much TIM, not enough TIM, low-quality TIM, dirty TIM (didn't clean heatsink, die thoroughly), crooked mount, and/or clip or screws are too tight or not tight enough. I'm only giving these reasons because user error happens too often, and even the best of us may think otherwise.
Just an opinion... I think even a stock cooler can cool decently without IHS, but it may be smarter to buy a new/better heatsink than take the risk for a cheapo heatsink.
Example:
My old Opteron 148 (unlidded) was 38-40C load at 1.45v on a Thermaltake Silentboost.
Warning:
Do NOT position the razor at an angle at any moment in time, or you will scrape the CPU traces (I scraped mine a bit, but I'm lucky it's still fine... learned from my mistake, and now I'm telling you about it).
I WILL BE UPDATING THIS THREAD PERIODICALLY BECAUSE I STILL HAVE TO NEATEN IT AND POSSIBLY ADD MORE INFO.
Pictures:
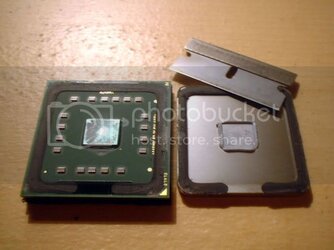
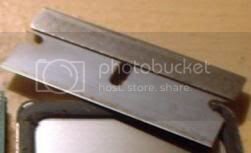
*THE RAZOR IN THIS NEXT PICTURE IS IN MY OPINION THE BEST FOR OUR PURPOSE*
Thanks to my buddy Infinitevalence on this pic:
Infinitevalence's CPU with removed IHS and razor
Contact:
FEEL FREE TO ASK ME ANY QUESTIONS!!!
PM me, instant msg me on AIM, or send off an email to me through the forums here.
Any questions/suggestions are welcome. I will not take offense to anything you have to say. I have been bugged by about a dozen people so far about IHS removal, and I knew the day would come for me to write up a tutorial. I want this tuturial to be as perfect as can be and without input I cannot do that.
THANK YOU!!!
IHS Removal Tutorial 101
If you have already removed your IHS, please post your before and after temps, and CPU model (as well as core/socket, and method of cooling) to help others understand the advantages.
Caution:
- **I AM NOT RESPONSIBLE FOR ANY DAMAGES!! YOU'VE PROBABLY VISITED THIS THREAD KNOWING THE RISKS INVOLVED!! BE CAREFUL!!**
- THIS TUTORIAL WAS CREATED FOR AMD ATHLON64 ONLY!! I HAVE ONLY DONE IT ON THOSE CHIPS. IF YOU INTEND TO DO THIS FOR INTEL, YOU MAY BE AT RISK BECAUSE INTEL TENDS TO SOLDER ON THEIR IHSs. ASK SOMEONE BEFORE DOING THIS PROCEDURE ON ANY CHIP OTHER THAN AN AMD ATHLON64!!
Introduction and FAQ:
I've helped several people take off IHSs so far. Not to put anyone else's down in ANY way, but it definitely works flawlessly (keeping in mind you don't go too deep. That's the only worry with my technique... well, that would be the worry with any technique).
Q. First thing's first - What is an IHS?
A. An IHS is an Integrated Heat Spreader. IIRC, its main purpose is to protect the die, which in most cases ranges from 90nm to 130nm. The IHS is over double the size and takes the pressure from your cooler and universally spreads it across [so to speak] the entire CPU. Think of its purpose almost the same as a shim. They serve primarily as a protection of your component.
The IHS basically EXPANDS the surface area of the die. In almost no way does it help dissipate heat better. It's expanding the surface area to help remove pressure from a smaller area.
Ask yourself this: Would it hurt more to stand on the tip of a needle or to stand on the tip of a 1 inch thick pole? Both would hurt, but the needle will most likely puncture. This is very basic (don't laugh), but I'm basically showing you how the same amount of mass (your body weight) acts differently on both objects. This is basically because the needle has a lot less surface area on the tip.
So there you have it... the larger the area of something, the less pressure it will withstand per square nm (nanometer, or any measurement of area for the matter).
Because of the fact that removing an IHS will create a LOT more pressure on the die, you need to take into effect the risks involved. I personally recommend getting something similar to the Athlon XPs. If any of you have seen an Athlon XP, you will know that it has 4 small, black pads surrounding the die. They are there to remove unnecessary pressure from the die, so that it is not crushed.
I will soon post pix of what I've done and what you can obtain to use in the same manner as the Athlon XPs.
Q. Why should I remove my IHS?
A. You don't have to. The reason why many people do it is because they are 'overclockers'. Now, no one is trying to demean you if you don't do this. Think of it as this... some people do watercooling, and some people don't. Some people think it's worth the risk and some people don't. This is simply the same situation.
IF YOU REMOVE YOUR IHS AND DO IT PROPERLY, I GUARANTEE THAT YOUR TEMPERATURES WILL DROP WITHOUT ANY DOUBT!
Wait a second, why so - why doesn't EVERYONE do this? Well, don't forget... THE RISKS! You can say goodbye to your CPU in a matter of seconds, whether it be a $100 CPU, $200, $300, or whatever, you will NOT be happy to crush it. Once crushed, it's impossible to get it back.
In the case where you decided to remove your IHS, I will say that IN MOST CASES your temperature will drop AT LEAST 5C off of load temps.
Believe me when I tell you, I removed an IHS off of an Opteron 148. My load temp dropped from 54-56C (watercooling) to about 36-38C. That was roughly an 18C drop. Most IHS removals will NOT yield results like mine. My guess is that my IHS was just a poorly mounted one. This may happen to you, and you may actually be reading this for the sole reason of being one of those individuals.
Q. How long will this take?
A. Remember, I said BE PATIENT! I can do it in 60 seconds with ease, but that is more risky than spending 10 minutes. This is just a personal recommendation... I say make it last 5-10 minutes. It's a long time to cut a small object, but in 5-10 minutes you could be saving yourself $100-1000, depending on the pricetag of your chip.
If you think of any other Frequently Asked Questions, please refer them to me and I will keep it updated.
The Procedure:
Just to clear things up... I AM NOT RESPONSIBLE IF ANYTHING GOES BAD!! I'm just giving advice.
**TAKE YOUR TIME!!!!!!!**
First thing's first... you're gonna use a razor cuz it's thinner than a knife.
Second, only cut with the razor in parallel to the CPU. Don't tilt it in any way (I made that mistake and scratched the PCB of my CPU a bit, although it still works fine...
Third, make sure you put some sort of cushining under the CPU pins before you put it on a table-top. I made this mistake and bent my pins, and spent 10min fixing it back. You can use the black spongy stuff the CPU came on when you bought it (both OEM and RETAIL pack the CPU the same way).
Fourth, start cutting on one of the 4 corners into the black gooey stuff. Sway the razor side to side until it slips in under the IHS. Once you're in deep enough you'll feel it (DON'T GO TOO DEEP OR YOU'LL CUT A TRANSISTOR). After you feel that, you just drag the razor around the entire IHS until it finally pops off. Have you ever cut paper with scissors, where after the first cut with the scissors you just slide scissor down the paper til it reaches the end? That's what you do with the razor. At least that's how I did it and thought it was easy. It's better than slicing the whole time... just once you're in, slide the razor the rest of the way.
Hope this helps... BE PATIENT!! TAKE YOUR TIME!!!
Recommended Cutting Razor:
My razor is not double-sided. It's the type of razor that you place into the replaceable box cutter razors. It's single-sided, and on the other side it has a support - this way the razor doesn't bend.
It definitely isn't a good one to remove epoxied heatsinks, though... cuz that support on the other side of the blade is a tad bit too thick and makes it hard to maneuver by a video card ram chip (yes, I've screwed up b4).
The double-sided, or a UNIVERSALLY THIN blade would be best to remove epoxied heatsinks.
You may also use dental floss for IHS removal, but I've never tried that. I don't think I'd have to explain how to use dental floss... basically get it under the IHS and attempt to slice away.
Mounting a Cooler that Uses the Motherboard Bracket:
**Before you even get into mounting the heatsink, either CLEAR CMOS or reset your CPU in bios to optimal STOCK VOLTAGE settings. All temperatures I use here are based on STOCK VOLTAGES for a single-core chip. Add 2-4C for dual-core**
After the IHS is off, approximate the depth of the IHS - from the top of the IHS where the info is to the other side, where it touched the die of the CPU. Don't measure the edge of it because it is thicker than the center of it.
This is the exact measurement that you will need to shave down the mobo's bracket. The mobo's bracket should have 4 round corners, as well as the 2 grooves where the screws mount into. All 6 of those need to be shaved down to your approximate measurement. The more you shave, the tighter the heatsink will mount to your CPU, so BE CAREFUL! Use your judgement!
It may be smart to shave less, rather than more, and then do trial and error. If you shave a tad bit too little, trust me you won't harm your CPU (considering you don't CRUSH by a mismount). As long as the heatsink makes decent contact, your temps won't sky rocket.
Any time you do mount the heatsink to the chip after shaving, power on the PC, and GET INTO BIOS!! Quickly go to check your CPU temp to see if it's idling at no more than 35-38C. If it's idling over 38C, you most likely didn't mount the heatsink properly, or didn't shave the mobo bracket enough. Shave a bit more, UNIVERSALLY on each extended piece (each of the 6 pieces).
If your temp is less than or equal to 38C idle, restart and boot into your OS. Prepare to quickly check your temp again. If it's < 40C after everything is loaded and idle, run a stress test (prime 95 high power consumption would be a good one), and check your temps. If you broke 45C, then my guess is it's a bad mount. I would say that 35-40C MAX would be ideal for stock voltage LOAD temps.
Remember, everything I speak of here is running at stock voltages. Now, if your room is hot, don't use my temps as reference... you're on your own with distinguishing the differences. Also, the same goes for extremely bad case temps.
Ideally, at stock voltage, you shouldn't break 40C load with any cooler. If you do, you most likely have a bad mount or didn't shave the mobo bracket enough... or... any of the other POOR cooling reasons, such as: too much TIM, not enough TIM, low-quality TIM, dirty TIM (didn't clean heatsink, die thoroughly), crooked mount, and/or clip or screws are too tight or not tight enough. I'm only giving these reasons because user error happens too often, and even the best of us may think otherwise.
Just an opinion... I think even a stock cooler can cool decently without IHS, but it may be smarter to buy a new/better heatsink than take the risk for a cheapo heatsink.
Example:
My old Opteron 148 (unlidded) was 38-40C load at 1.45v on a Thermaltake Silentboost.
Warning:
Do NOT position the razor at an angle at any moment in time, or you will scrape the CPU traces (I scraped mine a bit, but I'm lucky it's still fine... learned from my mistake, and now I'm telling you about it).
I WILL BE UPDATING THIS THREAD PERIODICALLY BECAUSE I STILL HAVE TO NEATEN IT AND POSSIBLY ADD MORE INFO.
Pictures:
*THE RAZOR IN THIS NEXT PICTURE IS IN MY OPINION THE BEST FOR OUR PURPOSE*
Thanks to my buddy Infinitevalence on this pic:
Infinitevalence's CPU with removed IHS and razor
Contact:
FEEL FREE TO ASK ME ANY QUESTIONS!!!
PM me, instant msg me on AIM, or send off an email to me through the forums here.
Any questions/suggestions are welcome. I will not take offense to anything you have to say. I have been bugged by about a dozen people so far about IHS removal, and I knew the day would come for me to write up a tutorial. I want this tuturial to be as perfect as can be and without input I cannot do that.
THANK YOU!!!
Last edited:

 , still nothing to sneeze at compared to my last 165 that took 1.56v in the bios to hit 2.8. At 1.375 in the bios it shows up as 1.328 in cpu-z